Showing posts with label Recipes. Show all posts

Monday, December 19, 2011

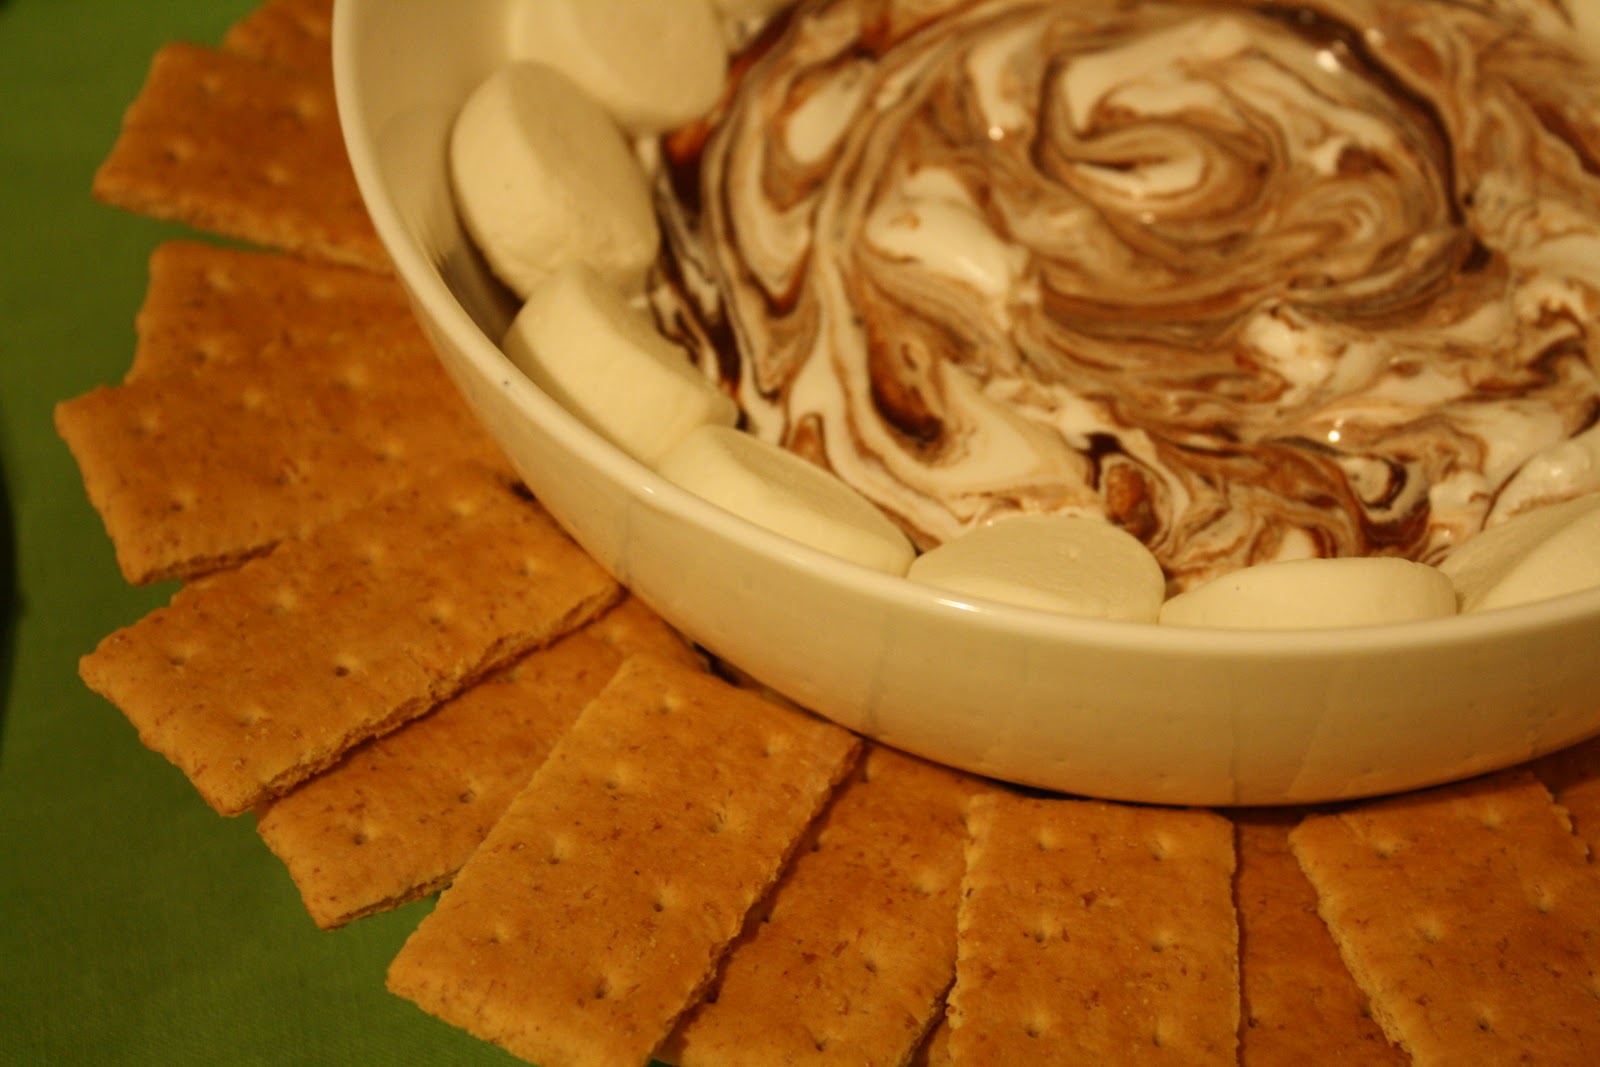
Lazy S'mores

Let's pause for a second and think about how amazing s'mores are. ..... Ahhh, everyone should be sporting wistful smiles at this point. So here's the thing. S'mores are so amazing. But... they're not perfect.
I know! I know! Take it easy!! No need to get your cojones in a bunch. (My 11th grade Spanish teacher always used to say that to us.) Now, before you disown me for speaking blasphemies against the almighty s'more, hear me out.

S'more Pros:
- Crunchy graham crackery goodness
- Ooey, gooey marshmallowy meltness
- Rich, glorious chocolatey sweetness
- Nostalgia-inducing
- Always even better than you remembered them tasting
- Fun and delicious


S'more Cons:
- Building a fire
- Waiting for fire to reach perfect roasting temperature
- Searching for perfect roasting stick
- Waiting for the mallow to roast to your liking
- Sometimes unintentionally sacrificing your mallow to the fire as it slips off your stick
- Waiting all over again to roast a new mallow
- Chocolate never quite melts
- Graham cracker on both sides of s'morewich... is sometimes a little too much graham

Now, wouldn't it be nice if we could experience all the Pros on the list without having to deal with the Cons? Well, dear readers, now we can. I give you: The Lazy S'more. So easy, so delicious, the only problem you'll have is controlling yourself from consuming coma-inducing amounts.


Ingredients:
1 1/2  cups semisweet chocolate chips
1  can (14 oz) sweetened condensed milk (not evaporated)
1/2  cup marshmallow creme
A handful of actual marshmallows (any size)
1  box graham crackers

Directions:
1. In small microwavable bowl, microwave* chocolate chips and condensed milk on High for 1 to 2 minutes, stirring occasionally, until chips are melted. Stir to mix well. Pour into 9-inch glass pie pan, spreading evenly.
 

2. Drop marshmallow creme by tablespoonfuls randomly over chocolate mixture. Microwave* on High for about 30 seconds or until marshmallow creme is softened. Immediately with knife, make several small swirls through marshmallow and chocolate, creating a marbled appearance. Line outer edge of bowl with marshmallows.
 

3. Serve immediately with graham crackers for dipping. Enjoooooooy!

*If you, like me, don't own a microwave, you'll melt your chocolate together with the sweetened condensed milk in a small saucepan on the stove over medium heat.
*For this step, heat it in a 350 oven for 2-4 minutes.


Thursday, December 8, 2011

Cookie Baking Tips?

Dearest Readers!

I come to you tonight humbly seeking advice! As I've said many a time before on ye olde blog, my cooking skills vastly outpace my baking skills. Lately I've been venturing more and more into uncharted kitchen territory, successfully baking a pumpkin pie and a reallllly yummy bread (recipe post to come! want to try it once more to make sure it's legit).

Progress.

However. My fiercest oven enemy is that sweet concoction of flour, sugar, and a whole bunch of other cool stuff - cookies. I destroy cookies. Betty Crocker cries in her grave whenever she hears me utter the fateful phrase "I'm gonna try to make some cookies today." I'm like the Anti-Crocker. Okay, maybe it's not quite that bad, buuuut then again, it's pretty bad. For some reason or another, I can NEVER get my cookies to come out just right! I even mess up the store-bought dough cookies... you know, the ones that are supposed to be fool proof? Yea, apparently they're not Anti-Crocker proof.

Sometimes my cookies taste okay, but they're always too hard. And sometimes they taste BAD and are too hard! And sometimes, they're not hard which would mean yay! but it's not yay! because instead, they are cake. Little cake circles. And they usually taste awkward because people's taste buds can't make sense of something shaped like a cookie being so spongy and weird.

Guys, all I want is to produce a batch of yummy, soft cookies. It can't be that difficult! I swear, seven year old girls yield better cookies results from their easy-bake ovens. Maybe I should just get one of those... make my life a little bit easier... and by "those" I mean hire a seven year old girl to bake me some quick choco-chip miracles from her $25 Hasbro baking machine.

No! I refuse to admit defeat! I need to make some cookies for a party on Saturday and for once I'd like my plate of cookies to NOT be left sitting on the table, still piled high with inferior, ignored cookies that by now have started to develop some serious self-esteem issues which only add to their likelihood of being avoided by each new person that looks upon their sorry, pitiable cookie faces.

So! Any cookie tips? How do I make yummy, soft, moist, NOT cake-like, melt-in-your-mouth, scrumptious, Crocker-worthy cookies?? I've got a few recipes, but I'm open to recipe ideas as well!
Thank you so much for any advice you can give me! :)

Wednesday, October 26, 2011

Pumpkin Pie from Super Scratch!

From-Scratch Pumpkin Pie... oh yea.


Alright, so here's the thing.If you look through my recipes link, you'll notice a gaping void amidst the various kitchen creations: desserts. I'll admit it, desserts just generally aren't my thing. Why? I'm not entirely sure but it's a likely combination of that fact that 1. I don't really have a sweet tooth at all as it is. I'd much rather eat a taco than a donut any time of the day. And 2. I'm not much of a baker! And that's probably because when you bake, you actually have to follow the directions, not just willy-nilly improvise which is the way that I generally like to cook :)

Anyway, I really stepped out of my comfort zone here to bake this pie, and I was shocked and amazed at the fact that it actually came out great. I would have been satisfied with palatable but my husband and I could not stop ourselves from a second slice of this after our first! It was deliiiiish.
So here goes.

Crust Ingredients:
1 cup all-purpose flour
1/4 cup whole wheat flour
1/2 teaspoon salt
1 tablespoon granulated white sugar
1/2 cup unsalted butter, chilled, and cut into roughly 1 inch pieces
1/8 to 1/4 cup ice cold water

Pecan and Cookie Layer (optional):
1/4 cup pecans, toasted and ground
1/4 cup crushed gingersnap cookies or graham crackers

Pumpkin Filling Ingredients:
3 large eggs
2 cups fresh pumpkin puree or 1 - 15 ounce can pure pumpkin
1/2 cup heavy whipping cream
1/2 cup light brown sugar
1 teaspoon ground cinnamon
1 teaspoon 'pumpkin pie spice' (which can be found in most grocery stores, or you can make your own: a combination of ground cinnamon, ginger, nutmeg and cloves)
1/2 teaspoon salt

Whipped Topping Ingredients:
1 cup heavy whipping cream
1 1/2 tablespoons pure maple syrup (the REAL stuff, not the maple "flavored" sugar syrup junk)

Crust Directions:
1. In a food processor or stand mixer, thoroughly combine the flour, salt, and sugar. Add the butter and process until the mixture resembles coarse meal. Add 1/8 cup (about 2 tablespoons) water and process just until the dough holds together when pinched. If necessary, add the remaining water.
 
2. Turn the dough onto your work surface and gather into a nice tight ball. Cover with plastic wrap, and refrigerate for 30 minutes to one hour before using. This will chill the butter and relax the gluten in the flour. After the dough has chilled sufficiently, place on a lightly floured surface, and roll into a 13 inch circle. A rolling pin definitely helps keep the dough even, but you can use your hands just as well if you're feeling labor-ready :) To prevent the pastry from sticking to the counter and to ensure uniform thickness, keep lifting up and turning the pastry a quarter turn as you roll - always roll from the center of the pastry outwards.  
3. Gently transfer to a 9 inch pie pan. Tuck the overhanging pastry under itself and use a fork to make a decorative border. Refrigerate the pastry, covered with plastic wrap, for about 30 minutes.

Pecan Cookie Layer Directions
Toast pecans in a 350 degree F oven for 8 minutes or until lightly browned and fragrant. Cool and then place the pecans, along with the cookies, in a food processor and process until finely ground. Press this mixture evenly onto the bottom and up the sides of the unbaked pie crust. Cover and return the pastry to the refrigerator while you make the pumpkin filling.
*At this point, turn your oven up to 375 degrees F and place the rack in the bottom third of your oven.*

Pumpkin Filling Directions:
Yeaaaa... so this is where things got a little crazy for little ole me. Jump to the bottom for instructions on fresh pumpkin puree (which is what I did). If you're feeling adventurous, you can use FRESH pumpkin in your pumkin pie. How fun does that sound? Well, maybe you're a better squash handler than I and may actually have fun with that. Or if you're a lazy human being, you'll just use the 15 ounce can of pure pumpkin puree! 
1. In a large bowl lightly whisk the eggs. Add the remaining ingredients and stir to combine. 
2. Pour the mixture into the prepared pie shell. (You can place the pie on a large baking pan to catch any spills - optional.) Bake the pie for about 45-55 minutes or until the filling is set and the crust has browned (the center will still look wet). A knife inserted about 1 inch from side of pan will come out almost clean.
3. Place the baked pie on a wire rack to cool then transfer to the refrigerator to fully chill. 

Whipped Topping Directions:
Place the heavy whipping cream and maple syrup in bowl of your stand mixer. With the whisk attachment, whip the cream until soft peaks form. Again , you can also whisk by hand if you're feeling labor-ready! You can even use a Magic Bullet if you own one (that's what I did).

Serve the pie chilled or at room temperature (your preference) with a dollop of your homemade maple whipped cream and sprinkle with just a dash of fresh ground cinnamon and/or nutmeg. De. Lish.


So the fresh pumpkin puree. I was at the market and they were selling these adorable little pumpkins labeled "pie pumpkins" for super cheap and I couldn't resist. I thought "I'm gonna overcome my aversion to baking and become a Supermom Betty Crocker Martha Stewart Baker Extraordinaire overnight. This'll be FUN."

So I get home and begin my pumpkin pie extravaganza, starting with the crust. Everything was going great and I was feeling all super confident about this project already. So I get ready to take on the pumpkin filling part of the job. Alright, now... sigh... I am ashamed to admit this but I must, simply so you can all understand just how much of a natural baker I AM NOT. In my mind I pictured it going like this:
- Slice open pumpkin.
- Remove seeds and stringy stuff (yes I did know that much from my carving experiences!)
- Scrape out the pumpkiny part of the pumpkin
- Make delicious pumpkin pie filling
- Skip off into sunset in a field of daisies to the sound of angel's wings and laughing babies

Yea. It didn't quite work out that easily. Here's what actually happened: 
- Got out my largest knife, and attempted to slice the pumpkin  rock-hard gourd of impenetrable strength
- Knife bounced off ineffectually, resembling a flimsy plastic utensil against a giant ball of rubber
- Tried my best karate chop-homicidal samuri whack at the thing
- Missed the pumpkin altogether and screamed like a small child
- Stared at pumpkin in anger
- Picked up pumpkin and smashed - yes, literally smashed - it against the granite countertop
- Repeated this motion several times, as small cracks were appearing here and there
- Pumpkin eventually broke open into 3 fairly similarly-sized pieces

This was my first great victory! Then I removed the seeds and stringy stuff as planned. Then I thought, all I have to do is scrape out the pumpkin part of the pumpkin. Well, no one told me that that was going to be hard as a rock as well! Finally, I did what any normal, logically-thinking adult does in a situation like this: I cried. No, just joking. I went to google of course!! Then I was informed my the world wide web that pumpkin needs to be cooked to get soft. Riiiiiiiight. I knew that all along.

So here're the real instructions on how to make homemade pumpkin puree without making a fool of yourself:
1. Find a way to break into your pumpkin. I searched everywhere for someone else who had my same problem, but maybe I'm just really weak and have dull knives. All the instructions I found just said "slice pumpkin in half tehehehehe" like it was as soft of butter! The only advice I could manage to find (other than using a hand saw - seriously, one guy suggested that to me) was to use a large serrated knife and chop the "head" of the pumpkin off first (where the stem comes out) and then you have a flat surface there to slice it in half or quarters from there.
2. Regardless of your method, once you're in, scrape out seeds and stringy stuff.
3. Place the pumpkin pieces on a lightly greased pan either face up or face down (doesn't really matter)
4. Bake in a 350 degree oven for at least 45 minutes, or until the pumpkin if very easily pierced with a fork
5. Allow to cool for handling
6. Scrape out all the pulp/meat/pumpkin (whatever you wanna call it) and process it until smooth
7. From here, you can use it the same as canned pumpkin!

Creamy Pumpkin Soup

'Tis the season for all things pumpkin! I have two super scrumptious pumpkin recipes to share with y'all and I was originally going to smash them together into one post because smashing is fun to do. Especially smashing pumpkins. For realz yo, I had to smash a pumpkin for one of these recipes. Don't believe me? Read on, skeptical but intrigued readers, read on. Anyway, I decided to make two separate posts for these recipes since they are both awesome and both a little bit long. So... here's numero uno!

Creamy Pumpkin Soup


I recently had a friend ask me if I had a recipe for pumpkin soup, which was a great motivation for me to get one together! I had made similar soups before (butternut squash, potato, etc.) but never a pumpkin soup specifically. So I figured I'd try my hand at pumpkin soup and see what happened. Turns out, it turned out super yummy. This recipe made enough for my hubs and I to each have two big bowls and put a lot away into the freezer as well. So here we go:


Ingredients:
3 1/2 cups low-sodium chicken broth
2 cups milk
2 cups pure pureed pumpkin (yay for alliteration!) - either canned or fresh
1 large potato, peeled and diced
1 large sweet potato, peeled and diced
1 clove garlic, minced
1 medium onion, diced
2 tablespoons butter/oil
1/2 tsp ground nutmeg (fresh is best)
1/4 tsp cinnamon
salt and pepper to taste
cayenne pepper to taste (optional)
topping:
1 cup sour cream
1-2 tablespoons fresh parsley or chives
3 bacon strips or 1 spicy sausage link - cooked and crumbled

Directions:
1. In a large saucepan or dutch oven, saute garlic and butter over medium heat until fragrant and tender. Add potatoes, hit it with some S&P and saute until the potatoes are nice and tender.
2. Set some potatoes aside (you'll add them later for a bit of texture). Take the rest of the potato/onion/garlic deliciousness and puree it in a blender until smooth. Return to saucepan.
3. Add broth, milk, pumpkin and seasonings. Stir and continue cooking until it's hot, creamy and delicious. The dairy will thicken as you continue to heat it. Feel free to spice it to your liking. If you like a sweeter soup, omit the cayenne and add some extra cinnamon and a bit of ginger. If you like it spicier, heavy-hand the cayenne and add some ground cloves. This is your soup, you know what you like. Taste it as you cook it and add what you need! Don't wait till it's on the table to taste it for the first time :P
4. Towards the end of the process, add your potatoes from earlier back in. Like I said, this adds a bit of texture to the soup. Of course if you're going for a completely smooth texture, you'd puree all the potatoes :)
5. To serve, fill up your bowls, do a dollop of sour cream, and sprinkle with your parsley/bacon or chive/sausage... or whatever alternative you've chosen! (turkey bacon, vegetarian bacon, chorizo, etc.)
6. Enjoooooooy!


Mine was topped with sour cream, chives, chorizo and homemade crackers!
Soooooo good :)


Stay tuned for recipe #2 - my first ever dessert post on this blog!!!

Monday, January 17, 2011

Recipe for a 5 Month Old Baby Gemma

I live with an amazing little girl named Gemma Therese. 


She's five months old, smart, chubby, happy, and she is SO cool. I have hoards of people constantly crowding around me, asking me, "CA, how can I get a baby like that?" (This mostly only happens in my head, but still, even imaginary fans deserve answers!) So I say to them, read my blog, I'll post the recipe soon. It's so simple, anyone can do it! So. Here's the recipe:

 Start with one fresh-from-the-oven newborn baby born on August 13th, 2010. Name her Gemma Therese. Then, each day, for five months:
- Give plenty of mother's milk, straight from the source
- Shower with a near-constant stream of hugs and kisses
- Keep clean with regular diaper changes and baths
- Make time every day for song singing, story telling, belly tickling, face making, and other entertaining frivolities
- Introduce baby to and see that she has plenty of playtime with friends, especially with Jesus

Carry out these activities with great care and dedication, ensuring it is all done in an environment of endless love, happy laughter, excellent music, and that classic Californian "chill" factor. (I know, she lives in Ohio, but she's genetically 50% Californian. Roots are important, people.)


And there ya have it, folks. My secret Gemma recipe, now yours to enjoy :)


Vote For Us @ TopBabyBlogs.Com - A Top Baby Blog List By topbabyblogs.com

Visit Top Mommy Blogs To Vote For Me

Friday, January 7, 2011

Salsa Chicken with Spicy Beans & Lentils

I love this recipe because there are so many ways to mix it up! I swear, we have some variation of this meal once a week. My original version of this meal is the Salsa Chicken over a bed of rice, smothered in cheddar cheese. IIIII know! Delicious. However, it being the new year and all, I decided to cut back on the cheese a bit. I also substituted lentils for the rice, because lentils are supposed to be a symbol of prosperity in the new year, and it's traditional to cook/eat lots of lentils in the month of January!


This recipe serves two. So. Here goes:


Ingredients:
2 chicken breasts
3/4 cup salsa (your favorite store-bought or even better, homemade!!)
2 tbs shredded cheddar cheese
1 avocado
1 small onion
1 garlic clove
1/2 cup lentils
2 cups water
1/2 cup beans (kidney, black, pinto, you decide)
3ish tbs coconut oil
1/4 tsp cumin
1/4 tsp turmeric (optional)
A few shakes of chili powder or cayenne pepper (depending on how spicy you like it)
salt & pepper to taste


Directions:
Start with the lentils right away. In a small pot, combine your water and lentils and bring to a rolling boil. Pop a lid on it, reduce the heat to low, and let it simmer for 15-20 minutes or until tender. While that's a'boilin, dice up your onion and heat a cast iron skillet up on medium heat. Drop in a tablespoon of coconut oil. Once that's hot, toss in your onions and garlic, add a bit of S&P (salt and pepper) and saute them until just tender. Take them out of the skillet, and set aside. Turn your oven on and set to 350 degrees.

With your pan still hot, drop in about 2 tablespoons of coconut oil. Sprinkle one side of your chicken breasts with some S&P and place them into the pan seasoned side down once the oil is hot. Now season the other side with some S&P. (I also add a few dashes of chili powder at this point, but that's optional.) You'll want to let these sit for about 3-5 minutes on each side, until you get a nice golden color going on. Once they are golden on each side, put them into a lightly oiled baking pan, and transfer them into the oven to finish cooking all the way through, another 5-10 minutes depending on how thick they are.

At this point, your lentils should be ready. Drain any excess water. Add the sauteed garlic & onions from earlier, beans, 1/4 cup of salsa, and all your spices. Mix well. (It will smell AMAZING.) Put the lid back on, but keep the pot off the heat.

Slice up your avocado and shred up your cheese if it isn't already. When the chicken is cooked all the way through, take them out of the oven and turn it off. Then pour 1/2 cup of the salsa all over the top of them, and sprinkle the cheese on top of that. Pop them back into the warm oven for about a minute or so, just to melt the cheese.

And now we plate. Lay down a nice pile of the beans and lentils off to one side of the plate. Lay down your chicken on the other side of the plate, and top with avocado slices.


Sooooo good!
Notes:
The lentils. Check which kind you are getting. I use lentils that don't require pre-soaking, but many do! If those are the kind you have, you'll have to prep them ahead of time.

The skillet. You definitely don't need a cast iron one, I just like them. I think they cook food more evenly.

The chicken. If you can, fresh, local organic chicken is the way to go! If not, some nice fresh chicken from the butcher is good too. You can also use frozen chicken breasts, as long as they are completely thawed before you start this meal. You don't want them super cold either, that way they cook evenly all the way through.

The spices. You can really do what you want here. If you don't have turmeric, I would first suggest getting some. It. Is. So. Good. And so good for you! (Turmeric has been called one of nature’s most powerful healers. It has great anti-inflammatory properties which can address symptoms of arthritis. It is anti-bacterial and anti-fungal. It is said to be a digestive aid that will settle the stomach. Turmeric contains a rich source of antioxidants that help fight against free radicals. It also is said to have anti-platelet properties that help protect against strokes and heart attacks. Studies have also shown that it has a beneficial effect on the liver.) However, if you do not have it, just use some more cumin. As for the heat, I like my food super spicy, so I use a bunch of cayenne and chili powder. You know your palette best. Be modest at first, and just add what you like; know that you can always add more spice later.

The cheese. If you're lactose intolerant or cutting calories even more, just omit the cheese. With everything else going on in this dish, you really won't miss it.

The avocado. Make sure you pick up a nice, ripe avocado. The best way to test this is to hold the avocado in your hand and feel around the stem area with your thumb. If it's soft up there, it's good to go. (Not too soft though, otherwise it'll just turn into mush... which honestly will still taste amazing, just won't be as pretty).

So there you have it. This meal is nutritious, figure-friendly, and to-die-for delicious. Hope you enjoy it!


Visit Top Mommy Blogs To Vote For Me
Related Posts Plugin for WordPress, Blogger...