... for the world to end in 2012!!! For reals. I totally believe that stuff. Ya know, the whole Mayan Calendar thing. Totally legit.
So since this is our last year on earth, we better make the most of it!! What am I planning on doing? My New Year's resolutions are fairly simple.
1. Post to my blog twice a week.
2. Take my vitamins EVERY DAY!
3. As a family, we are committing to praying a rosary every evening after dinner.
4. Sew, sew, sew! 2012 is gonna be one crafty year, people!
And that's all I have so far! I'm looking forward to a holy, healthy, and crafty New Year! :)
Anybody have any exciting resolutions this year?? Let's encourage each other to be faithful to our goals!
Saturday, December 31, 2011
Monday, December 19, 2011
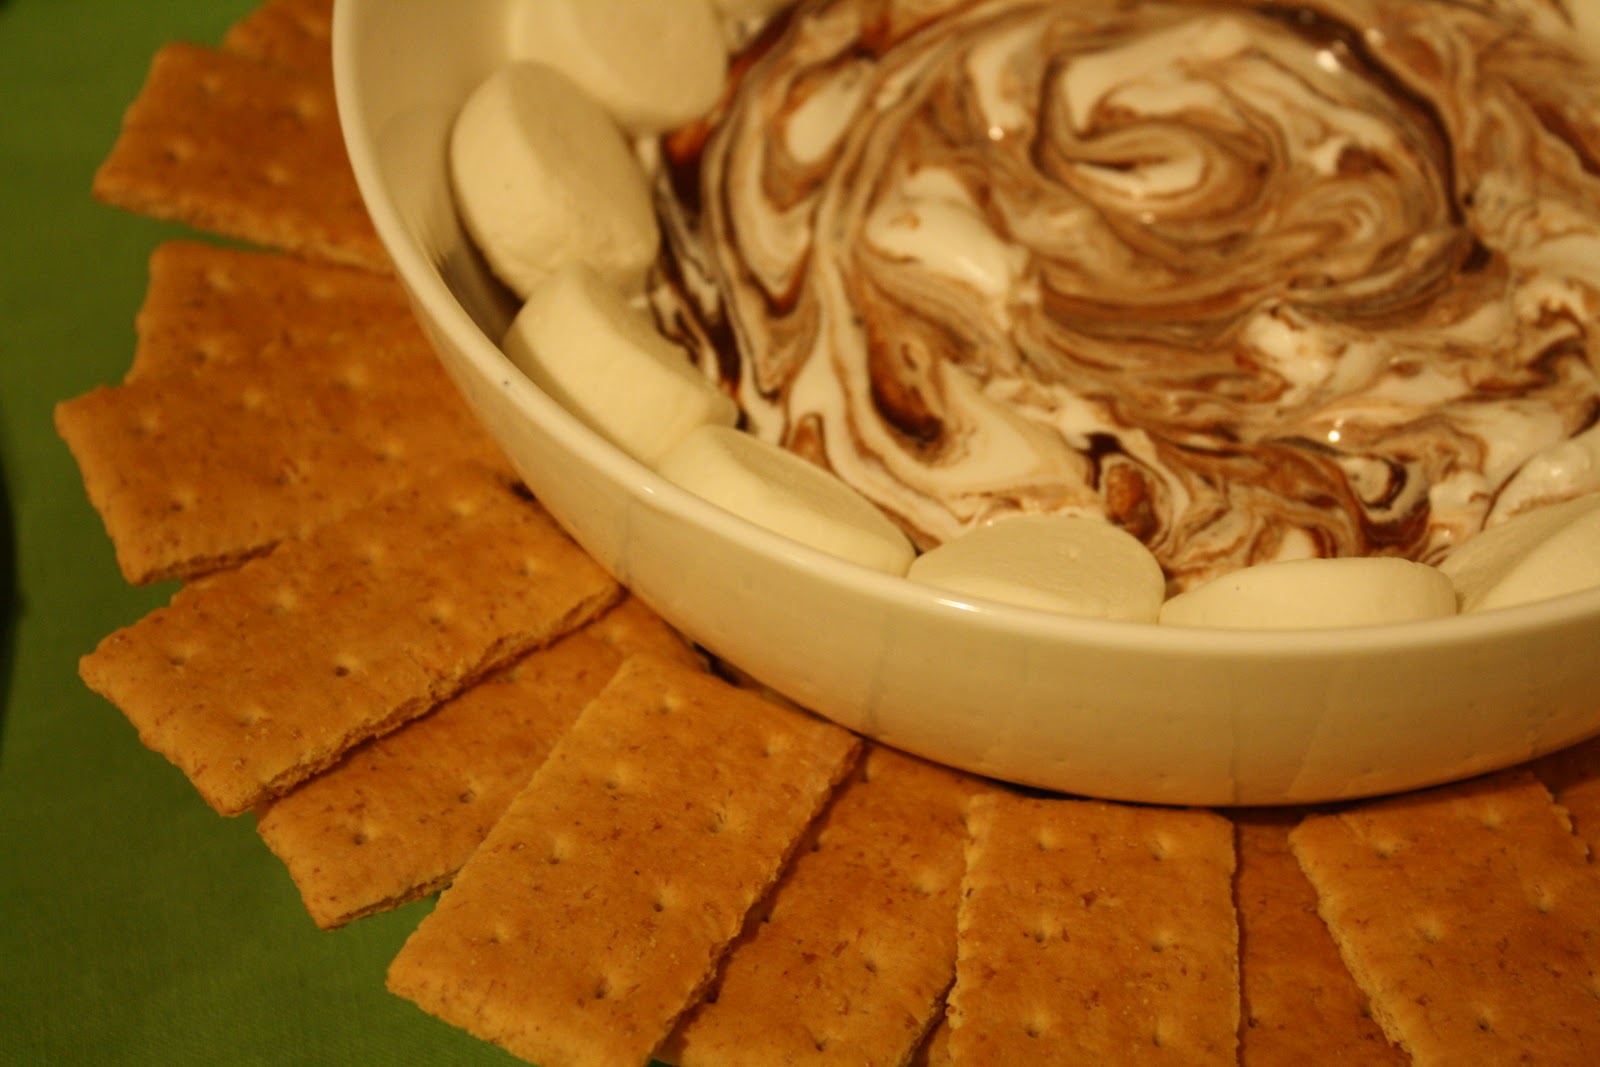
Lazy S'mores
Let's pause for a second and think about how amazing s'mores are. ..... Ahhh, everyone should be sporting wistful smiles at this point. So here's the thing. S'mores are so amazing. But... they're not perfect.
I know! I know! Take it easy!! No need to get your cojones in a bunch. (My 11th grade Spanish teacher always used to say that to us.) Now, before you disown me for speaking blasphemies against the almighty s'more, hear me out.
 S'more Pros:
- Crunchy graham crackery goodness
- Ooey, gooey marshmallowy meltness
- Rich, glorious chocolatey sweetness
- Nostalgia-inducing
- Always even better than you remembered them tasting
- Fun and delicious
S'more Cons:
 - Building a fire
- Waiting for fire to reach perfect roasting temperature
- Searching for perfect roasting stick
- Waiting for the mallow to roast to your liking
- Sometimes unintentionally sacrificing your mallow to the fire as it slips off your stick
- Waiting all over again to roast a new mallow
- Chocolate never quite melts
- Graham cracker on both sides of s'morewich... is sometimes a little too much graham
Now, wouldn't it be nice if we could experience all the Pros on the list without having to deal with the Cons? Well, dear readers, now we can. I give you: The Lazy S'more. So easy, so delicious, the only problem you'll have is controlling yourself from consuming coma-inducing amounts.

Ingredients:
1 1/2 cups semisweet chocolate chips
1 can (14 oz) sweetened condensed milk (not evaporated)
1/2 cup marshmallow creme
A handful of actual marshmallows (any size)
1 box graham crackers
Directions:
1. In small microwavable bowl, microwave* chocolate chips and condensed milk on High for 1 to 2 minutes, stirring occasionally, until chips are melted. Stir to mix well. Pour into 9-inch glass pie pan, spreading evenly.
2. Drop marshmallow creme by tablespoonfuls randomly over chocolate mixture. Microwave* on High for about 30 seconds or until marshmallow creme is softened. Immediately with knife, make several small swirls through marshmallow and chocolate, creating a marbled appearance. Line outer edge of bowl with marshmallows.
 3. Serve immediately with graham crackers for dipping. Enjoooooooy!
*If you, like me, don't own a microwave, you'll melt your chocolate together with the sweetened condensed milk in a small saucepan on the stove over medium heat.
*For this step, heat it in a 350 oven for 2-4 minutes.

I know! I know! Take it easy!! No need to get your cojones in a bunch. (My 11th grade Spanish teacher always used to say that to us.) Now, before you disown me for speaking blasphemies against the almighty s'more, hear me out.
 S'more Pros:
- Crunchy graham crackery goodness
- Ooey, gooey marshmallowy meltness
- Rich, glorious chocolatey sweetness
- Nostalgia-inducing
- Always even better than you remembered them tasting
- Fun and delicious
S'more Cons:
 - Building a fire
- Waiting for fire to reach perfect roasting temperature
- Searching for perfect roasting stick
- Waiting for the mallow to roast to your liking
- Sometimes unintentionally sacrificing your mallow to the fire as it slips off your stick
- Waiting all over again to roast a new mallow
- Chocolate never quite melts
- Graham cracker on both sides of s'morewich... is sometimes a little too much graham
Now, wouldn't it be nice if we could experience all the Pros on the list without having to deal with the Cons? Well, dear readers, now we can. I give you: The Lazy S'more. So easy, so delicious, the only problem you'll have is controlling yourself from consuming coma-inducing amounts.
Ingredients:
1 1/2 cups semisweet chocolate chips
1 can (14 oz) sweetened condensed milk (not evaporated)
1/2 cup marshmallow creme
A handful of actual marshmallows (any size)
1 box graham crackers
Directions:
1. In small microwavable bowl, microwave* chocolate chips and condensed milk on High for 1 to 2 minutes, stirring occasionally, until chips are melted. Stir to mix well. Pour into 9-inch glass pie pan, spreading evenly.
2. Drop marshmallow creme by tablespoonfuls randomly over chocolate mixture. Microwave* on High for about 30 seconds or until marshmallow creme is softened. Immediately with knife, make several small swirls through marshmallow and chocolate, creating a marbled appearance. Line outer edge of bowl with marshmallows.

*If you, like me, don't own a microwave, you'll melt your chocolate together with the sweetened condensed milk in a small saucepan on the stove over medium heat.
*For this step, heat it in a 350 oven for 2-4 minutes.

Monday, December 12, 2011
Christmas Pictures!
So we had some Christmas photos taken - not in a studio though because :
A. Not gonna pay money for pictures that
B. Nine times out of Ten look rigid and awkward and cheesy, especially since
C. We have friends who are awesome photographers who will do it for freeee :)
Aside from the two full-on hour-long photo sessions I personally did of Gemma, our amazing friend took a family photo shoot for us the other night as well. We got a lot of really cute shots! Don't worry, I'm actually not going to post a picture overload here! I really just want to share a picture from this year compared with a picture of us at Christmas time last year. It's so fun and crazy to see how we've changed, grown, shrunk, etc!
THIS YEAR - 2011:

LAST YEAR - 2010:

Sweet Success!
A follow-up from my previous post: I made cookies... and they were awesome! I made White Chocolate Macademia Nut Cranberry Cookies and they were everything cookies should be: sweet, soft, slight crisp on the bottom and around the edges, chewy and gooey on the inside.... in a word, perfection.
This is not a moment of bragging, people, but REJOICING!! I can't express enough how much of a victory this is for me! My first ever GOOD cookies. Something I never thought myself capable of. Days later, and I'm still smiling about this accomplishment. Ahhhh... nothin' like the sweet taste of success. Pun. In. Tended.
Many thanks for the advice I was given! These are the tips I used:
- All the ingredients brought to room temp before making the dough
- Dough chilled in the fridge while the oven pre-heats
- Cookies baked on a silicone mat
- Under-baked by a minute or so
- Left on cookie sheet for a few minutes to "finish" before transferring to a cooling rack
- Most importantly, lots and lots of love added at every step of the process! :)
Oh. And I also finally learned (and implemented) what all these cookie recipes mean by "Cream butter and sugar together." Don't ask what I'd been doing in the past. SO. Embarrassing. Needless to say, I had never done it correctly until this batch! I think it made a world of difference.
Here are the pics of the gloriousness:
 |
| Yummy. |
 |
| I was so proud :) |
 | |||||||||
| I feel like I can taste them all over again just staring at the sugary goodness. |
Thursday, December 8, 2011
Cookie Baking Tips?
Dearest Readers!
I come to you tonight humbly seeking advice! As I've said many a time before on ye olde blog, my cooking skills vastly outpace my baking skills. Lately I've been venturing more and more into uncharted kitchen territory, successfully baking a pumpkin pie and a reallllly yummy bread (recipe post to come! want to try it once more to make sure it's legit).
Progress.
However. My fiercest oven enemy is that sweet concoction of flour, sugar, and a whole bunch of other cool stuff - cookies. I destroy cookies. Betty Crocker cries in her grave whenever she hears me utter the fateful phrase "I'm gonna try to make some cookies today." I'm like the Anti-Crocker. Okay, maybe it's not quite that bad, buuuut then again, it's pretty bad. For some reason or another, I can NEVER get my cookies to come out just right! I even mess up the store-bought dough cookies... you know, the ones that are supposed to be fool proof? Yea, apparently they're not Anti-Crocker proof.
Sometimes my cookies taste okay, but they're always too hard. And sometimes they taste BAD and are too hard! And sometimes, they're not hard which would mean yay! but it's not yay! because instead, they are cake. Little cake circles. And they usually taste awkward because people's taste buds can't make sense of something shaped like a cookie being so spongy and weird.
Guys, all I want is to produce a batch of yummy, soft cookies. It can't be that difficult! I swear, seven year old girls yield better cookies results from their easy-bake ovens. Maybe I should just get one of those... make my life a little bit easier... and by "those" I mean hire a seven year old girl to bake me some quick choco-chip miracles from her $25 Hasbro baking machine.
No! I refuse to admit defeat! I need to make some cookies for a party on Saturday and for once I'd like my plate of cookies to NOT be left sitting on the table, still piled high with inferior, ignored cookies that by now have started to develop some serious self-esteem issues which only add to their likelihood of being avoided by each new person that looks upon their sorry, pitiable cookie faces.
So! Any cookie tips? How do I make yummy, soft, moist, NOT cake-like, melt-in-your-mouth, scrumptious, Crocker-worthy cookies?? I've got a few recipes, but I'm open to recipe ideas as well!
Thank you so much for any advice you can give me! :)
Thursday, November 24, 2011
Happy Thanksgiving Everyone!!
This year I have so, so much to be thankful for! Here's a short list:
- My amazing, loving, talented, patient, godly, strong, super hot hubby, Rocky!
- My adorable, silly, smart, compassionate, fun-loving, crazy, precious daughter, Gemma
- My wonderful family and extended family who always make me feel SO very loved
- My incredibly strong, beautiful best friend, Jaime, her hubby Stewart, and especially the safe, gentle, God-filled birth of their son Caden Kolbe!! Our future godson!! :):)
- Our wonderful friends, near and far
- Food in my belly, clothes on my back, and our warm, cozy home
- An ever-faithful, everlasting love from the ever-faithful, everlasting God of the universe!!
- My gifts and talents and the ability to recognize them and use them every day
I could go on and on and on because God has been SO good to us, but it's time to head out the door and go to out Thanksgiving celebration!
What are YOU thankful for this year? :)
Saturday, November 12, 2011
Gemma - 15 months old?!?!
I can't believe how time is flying! My baby girl is already 15 months old (tomorrow) and every day she amazes me with something new.
Here's a quick list of her latest favorite activities:
- "Cook" with Mama aka stir a wooden spoon around an empty pot in the kitchen while I make dinner
- Play with Mama's cell phone and send random nonsensical texts to all my contacts (this is especially funny when it's someone I haven't talked to in months!)
- Dance (must. post. video. it is so adorable!)
- Eat! (apples, animal crackers, cottage cheese, pretzels, bread, pasta, pita, bagels, melon, carrots, beans, etc. and the occasional bites of Mommy's cookies and/or ice cream)
- Sit in Mommy or Daddy's lap and read books
- Chase or be chased all around the house
- Give kisses to Mommy and Daddy
- Imitate animal noises (especially doggies and lions)
- Master new signs. The ones she has down are: More, Milk, Thank You, Cracker.
Still working on: Like, Mommy, Daddy, Outside
- Master new words: Mama, Daddy, Thank You, Doggie, Yummm, Uh-Oh!, Yayyy, Hi, Bye
- Take off her own diaper (nooooot fun for Mom and Dad! haha)
- Run around naked
- Still in love with Bathtime - has been since birth!
- Build block towers and crash them down
- Give hugs and kisses to her Snuggle Bear and Baby Doll
- Explore and run around outside
- Blow kisses
- Climb (up stairs, onto chairs, onto tables, out of her high chairs, out of the shopping carts, onto bookshelves, etc. Point is, we have a little gymnast on our hands!)
- Be silly
- Smile and laugh at everything
- Wave to every person she ever sees anywhere (she's very friendly)
- Be AMAZING!!!
I just love this little girl so much!
Warning - picture overload! Also, sorry for some of the blurry shots - had to get the block tower building in action! Oh, and for the record - she was gnawing on this apple with her one and only tooth! So cute :)


Wednesday, October 26, 2011
Pumpkin Pie from Super Scratch!
From-Scratch Pumpkin Pie... oh yea.

Anyway, I really stepped out of my comfort zone here to bake this pie, and I was shocked and amazed at the fact that it actually came out great. I would have been satisfied with palatable but my husband and I could not stop ourselves from a second slice of this after our first! It was deliiiiish.
So here goes.
Crust Ingredients:
1 cup all-purpose flour
1/4 cup whole wheat flour
1/2 teaspoon salt
1 tablespoon granulated white sugar
1/2 cup unsalted butter, chilled, and cut into roughly 1 inch pieces
1/8 to 1/4 cup ice cold water
Pecan and Cookie Layer (optional):
1/4 cup pecans, toasted and ground
1/4 cup crushed gingersnap cookies or graham crackersPumpkin Filling Ingredients:
3 large eggs
2 cups fresh pumpkin puree or 1 - 15 ounce can pure pumpkin
1/2 cup heavy whipping cream
1/2 cup light brown sugar
1 teaspoon ground cinnamon
1 teaspoon 'pumpkin pie spice' (which can be found in most grocery stores, or you can make your own: a combination of ground cinnamon, ginger, nutmeg and cloves)1/2 teaspoon salt
Whipped Topping Ingredients:
1 cup heavy whipping cream
1 1/2 tablespoons pure maple syrup (the REAL stuff, not the maple "flavored" sugar syrup junk)
Crust Directions:
Pumpkin Filling Directions:

Crust Directions:
1. In a food processor or stand mixer, thoroughly combine the flour, salt, and sugar. Add the butter and process until the mixture resembles coarse meal. Add 1/8 cup (about 2 tablespoons) water and process just until the dough holds together when pinched. If necessary, add the remaining water.
2. Turn the dough onto your work surface and gather into a nice tight ball. Cover with plastic wrap, and refrigerate for 30 minutes to one hour before using. This will chill the butter and relax the gluten in the flour. After the dough has chilled sufficiently, place on a lightly floured surface, and roll into a 13 inch circle. A rolling pin definitely helps keep the dough even, but you can use your hands just as well if you're feeling labor-ready :) To prevent the pastry from sticking to the counter and to ensure uniform thickness, keep lifting up and turning the pastry a quarter turn as you roll - always roll from the center of the pastry outwards.
3. Gently transfer to a 9 inch pie pan. Tuck the overhanging pastry under itself and use a fork to make a decorative border. Refrigerate the pastry, covered with plastic wrap, for about 30 minutes.
Pecan Cookie Layer Directions:
Toast pecans in a 350 degree F oven for 8 minutes or until lightly browned and fragrant. Cool and then place the pecans, along with the cookies, in a food processor and process until finely ground. Press this mixture evenly onto the bottom and up the sides of the unbaked pie crust. Cover and return the pastry to the refrigerator while you make the pumpkin filling.
*At this point, turn your oven up to 375 degrees F and place the rack in the bottom third of your oven.*
Pumpkin Filling Directions:
Yeaaaa... so this is where things got a little crazy for little ole me. Jump to the bottom for instructions on fresh pumpkin puree (which is what I did). If you're feeling adventurous, you can use FRESH pumpkin in your pumkin pie. How fun does that sound? Well, maybe you're a better squash handler than I and may actually have fun with that. Or if you're a lazy human being, you'll just use the 15 ounce can of pure pumpkin puree!
1. In a large bowl lightly whisk the eggs. Add the remaining ingredients and stir to combine.
2. Pour the mixture into the prepared pie shell. (You can place the pie on a large baking pan to catch any spills - optional.) Bake the pie for about 45-55 minutes or until the filling is set and the crust has browned (the center will still look wet). A knife inserted about 1 inch from side of pan will come out almost clean.
3. Place the baked pie on a wire rack to cool then transfer to the refrigerator to fully chill.
Whipped Topping Directions:
Place the heavy whipping cream and maple syrup in bowl of your stand mixer. With the whisk attachment, whip the cream until soft peaks form. Again , you can also whisk by hand if you're feeling labor-ready! You can even use a Magic Bullet if you own one (that's what I did).
Serve the pie chilled or at room temperature (your preference) with a dollop of your homemade maple whipped cream and sprinkle with just a dash of fresh ground cinnamon and/or nutmeg. De. Lish.

So the fresh pumpkin puree. I was at the market and they were selling these adorable little pumpkins labeled "pie pumpkins" for super cheap and I couldn't resist. I thought "I'm gonna overcome my aversion to baking and become a Supermom Betty Crocker Martha Stewart Baker Extraordinaire overnight. This'll be FUN."
So I get home and begin my pumpkin pie extravaganza, starting with the crust. Everything was going great and I was feeling all super confident about this project already. So I get ready to take on the pumpkin filling part of the job. Alright, now... sigh... I am ashamed to admit this but I must, simply so you can all understand just how much of a natural baker I AM NOT. In my mind I pictured it going like this:
- Slice open pumpkin.
- Remove seeds and stringy stuff (yes I did know that much from my carving experiences!)
- Scrape out the pumpkiny part of the pumpkin
- Make delicious pumpkin pie filling
- Skip off into sunset in a field of daisies to the sound of angel's wings and laughing babies
Yea. It didn't quite work out that easily. Here's what actually happened:
- Got out my largest knife, and attempted to slice the pumpkin rock-hard gourd of impenetrable strength
- Knife bounced off ineffectually, resembling a flimsy plastic utensil against a giant ball of rubber
- Tried my best karate chop-homicidal samuri whack at the thing
- Missed the pumpkin altogether and screamed like a small child
- Stared at pumpkin in anger
- Picked up pumpkin and smashed - yes, literally smashed - it against the granite countertop
- Repeated this motion several times, as small cracks were appearing here and there
- Pumpkin eventually broke open into 3 fairly similarly-sized pieces
This was my first great victory! Then I removed the seeds and stringy stuff as planned. Then I thought, all I have to do is scrape out the pumpkin part of the pumpkin. Well, no one told me that that was going to be hard as a rock as well! Finally, I did what any normal, logically-thinking adult does in a situation like this: I cried. No, just joking. I went to google of course!! Then I was informed my the world wide web that pumpkin needs to be cooked to get soft. Riiiiiiiight. I knew that all along.
So here're the real instructions on how to make homemade pumpkin puree without making a fool of yourself:
1. Find a way to break into your pumpkin. I searched everywhere for someone else who had my same problem, but maybe I'm just really weak and have dull knives. All the instructions I found just said "slice pumpkin in half tehehehehe" like it was as soft of butter! The only advice I could manage to find (other than using a hand saw - seriously, one guy suggested that to me) was to use a large serrated knife and chop the "head" of the pumpkin off first (where the stem comes out) and then you have a flat surface there to slice it in half or quarters from there.
2. Regardless of your method, once you're in, scrape out seeds and stringy stuff.
3. Place the pumpkin pieces on a lightly greased pan either face up or face down (doesn't really matter)
4. Bake in a 350 degree oven for at least 45 minutes, or until the pumpkin if very easily pierced with a fork
5. Allow to cool for handling
6. Scrape out all the pulp/meat/pumpkin (whatever you wanna call it) and process it until smooth
7. From here, you can use it the same as canned pumpkin!
So I get home and begin my pumpkin pie extravaganza, starting with the crust. Everything was going great and I was feeling all super confident about this project already. So I get ready to take on the pumpkin filling part of the job. Alright, now... sigh... I am ashamed to admit this but I must, simply so you can all understand just how much of a natural baker I AM NOT. In my mind I pictured it going like this:
- Slice open pumpkin.
- Remove seeds and stringy stuff (yes I did know that much from my carving experiences!)
- Scrape out the pumpkiny part of the pumpkin
- Make delicious pumpkin pie filling
- Skip off into sunset in a field of daisies to the sound of angel's wings and laughing babies
Yea. It didn't quite work out that easily. Here's what actually happened:
- Got out my largest knife, and attempted to slice the
- Knife bounced off ineffectually, resembling a flimsy plastic utensil against a giant ball of rubber
- Tried my best karate chop-homicidal samuri whack at the thing
- Missed the pumpkin altogether and screamed like a small child
- Stared at pumpkin in anger
- Picked up pumpkin and smashed - yes, literally smashed - it against the granite countertop
- Repeated this motion several times, as small cracks were appearing here and there
- Pumpkin eventually broke open into 3 fairly similarly-sized pieces
This was my first great victory! Then I removed the seeds and stringy stuff as planned. Then I thought, all I have to do is scrape out the pumpkin part of the pumpkin. Well, no one told me that that was going to be hard as a rock as well! Finally, I did what any normal, logically-thinking adult does in a situation like this: I cried. No, just joking. I went to google of course!! Then I was informed my the world wide web that pumpkin needs to be cooked to get soft. Riiiiiiiight. I knew that all along.
So here're the real instructions on how to make homemade pumpkin puree without making a fool of yourself:
1. Find a way to break into your pumpkin. I searched everywhere for someone else who had my same problem, but maybe I'm just really weak and have dull knives. All the instructions I found just said "slice pumpkin in half tehehehehe" like it was as soft of butter! The only advice I could manage to find (other than using a hand saw - seriously, one guy suggested that to me) was to use a large serrated knife and chop the "head" of the pumpkin off first (where the stem comes out) and then you have a flat surface there to slice it in half or quarters from there.
2. Regardless of your method, once you're in, scrape out seeds and stringy stuff.
3. Place the pumpkin pieces on a lightly greased pan either face up or face down (doesn't really matter)
4. Bake in a 350 degree oven for at least 45 minutes, or until the pumpkin if very easily pierced with a fork
5. Allow to cool for handling
6. Scrape out all the pulp/meat/pumpkin (whatever you wanna call it) and process it until smooth
7. From here, you can use it the same as canned pumpkin!
Creamy Pumpkin Soup
'Tis the season for all things pumpkin! I have two super scrumptious pumpkin recipes to share with y'all and I was originally going to smash them together into one post because smashing is fun to do. Especially smashing pumpkins. For realz yo, I had to smash a pumpkin for one of these recipes. Don't believe me? Read on, skeptical but intrigued readers, read on. Anyway, I decided to make two separate posts for these recipes since they are both awesome and both a little bit long. So... here's numero uno!
Creamy Pumpkin Soup

I recently had a friend ask me if I had a recipe for pumpkin soup, which was a great motivation for me to get one together! I had made similar soups before (butternut squash, potato, etc.) but never a pumpkin soup specifically. So I figured I'd try my hand at pumpkin soup and see what happened. Turns out, it turned out super yummy. This recipe made enough for my hubs and I to each have two big bowls and put a lot away into the freezer as well. So here we go:
Ingredients:
3 1/2 cups low-sodium chicken broth
2 cups milk
2 cups pure pureed pumpkin (yay for alliteration!) - either canned or fresh
1 large potato, peeled and diced
1 large sweet potato, peeled and diced
1 clove garlic, minced
1 medium onion, diced
2 tablespoons butter/oil
1/2 tsp ground nutmeg (fresh is best)
1/4 tsp cinnamon
salt and pepper to taste
cayenne pepper to taste (optional)
topping:
1 cup sour cream
1-2 tablespoons fresh parsley or chives
3 bacon strips or 1 spicy sausage link - cooked and crumbled
Directions:
1. In a large saucepan or dutch oven, saute garlic and butter over medium heat until fragrant and tender. Add potatoes, hit it with some S&P and saute until the potatoes are nice and tender.
2. Set some potatoes aside (you'll add them later for a bit of texture). Take the rest of the potato/onion/garlic deliciousness and puree it in a blender until smooth. Return to saucepan.
3. Add broth, milk, pumpkin and seasonings. Stir and continue cooking until it's hot, creamy and delicious. The dairy will thicken as you continue to heat it. Feel free to spice it to your liking. If you like a sweeter soup, omit the cayenne and add some extra cinnamon and a bit of ginger. If you like it spicier, heavy-hand the cayenne and add some ground cloves. This is your soup, you know what you like. Taste it as you cook it and add what you need! Don't wait till it's on the table to taste it for the first time :P
4. Towards the end of the process, add your potatoes from earlier back in. Like I said, this adds a bit of texture to the soup. Of course if you're going for a completely smooth texture, you'd puree all the potatoes :)
5. To serve, fill up your bowls, do a dollop of sour cream, and sprinkle with your parsley/bacon or chive/sausage... or whatever alternative you've chosen! (turkey bacon, vegetarian bacon, chorizo, etc.)
6. Enjoooooooy!
Stay tuned for recipe #2 - my first ever dessert post on this blog!!!
Creamy Pumpkin Soup

I recently had a friend ask me if I had a recipe for pumpkin soup, which was a great motivation for me to get one together! I had made similar soups before (butternut squash, potato, etc.) but never a pumpkin soup specifically. So I figured I'd try my hand at pumpkin soup and see what happened. Turns out, it turned out super yummy. This recipe made enough for my hubs and I to each have two big bowls and put a lot away into the freezer as well. So here we go:
Ingredients:
3 1/2 cups low-sodium chicken broth
2 cups milk
2 cups pure pureed pumpkin (yay for alliteration!) - either canned or fresh
1 large potato, peeled and diced
1 large sweet potato, peeled and diced
1 clove garlic, minced
1 medium onion, diced
2 tablespoons butter/oil
1/2 tsp ground nutmeg (fresh is best)
1/4 tsp cinnamon
salt and pepper to taste
cayenne pepper to taste (optional)
topping:
1 cup sour cream
1-2 tablespoons fresh parsley or chives
3 bacon strips or 1 spicy sausage link - cooked and crumbled
Directions:
1. In a large saucepan or dutch oven, saute garlic and butter over medium heat until fragrant and tender. Add potatoes, hit it with some S&P and saute until the potatoes are nice and tender.
2. Set some potatoes aside (you'll add them later for a bit of texture). Take the rest of the potato/onion/garlic deliciousness and puree it in a blender until smooth. Return to saucepan.
3. Add broth, milk, pumpkin and seasonings. Stir and continue cooking until it's hot, creamy and delicious. The dairy will thicken as you continue to heat it. Feel free to spice it to your liking. If you like a sweeter soup, omit the cayenne and add some extra cinnamon and a bit of ginger. If you like it spicier, heavy-hand the cayenne and add some ground cloves. This is your soup, you know what you like. Taste it as you cook it and add what you need! Don't wait till it's on the table to taste it for the first time :P
4. Towards the end of the process, add your potatoes from earlier back in. Like I said, this adds a bit of texture to the soup. Of course if you're going for a completely smooth texture, you'd puree all the potatoes :)
5. To serve, fill up your bowls, do a dollop of sour cream, and sprinkle with your parsley/bacon or chive/sausage... or whatever alternative you've chosen! (turkey bacon, vegetarian bacon, chorizo, etc.)
6. Enjoooooooy!
 |
| Mine was topped with sour cream, chives, chorizo and homemade crackers! Soooooo good :) |
Stay tuned for recipe #2 - my first ever dessert post on this blog!!!
Monday, August 29, 2011
Quick Update!
Just wanted to let everyone know we came out of the hurricane with hardly a scratch. A few tree limbs in the yard, and lost power for maybe an hour in the middle of the night. We're feeling very blessed and grateful for everyone's prayers!
Friends of ours didn't fare quite as well: flooded homes and extended loss of power. Please pray for them and everyone else affected by this storm. I know there were some deaths and injuries as a result, so their families are in my prayers in a special way.
On a very good note... Gemma pretty much turned into a walker this past weekend! I'll post a video soon :)
Saturday, August 27, 2011
Anticipating Irene
Just figured I'd write a little posty-post on ye olde bloggy-blog before our power takes a hiatus.
Being from upstate New York, I've lived through my fair share of storms. Mostly blizzards, but a few crazy torndao-ish "microbursts" as they call them, as well as ice storms and thunderstorms. I lived through a few tornado warnings during my years in Ohio. And just a few days ago, I lived through an earthquake! (A feat which I also conquered while I was over in Kenya).
Anyway, the point I'm trying to make is that I'm pretty storm-weathered, if you will. However, I've never experienced a real hurricane before. Sometimes we'd get some pretty heavy rainstorms up in Syracuse, the leftovers of the hurricanes those down here had experienced. But now I'm just a few hours away from riding out my first real hurricane.
Here's the thing. I'm pretty scared!! When I listed all those storms I'd handled before, it wasn't to brag and say "I'm tough, bring it on!" I was just trying to comfort myself a little bit I think! I'm kind of like a housepet when bad weather comes. I get all quiet and tense for days beforehand, the anxiety building more intensely as the storm moves ever closer. And when it hits us, you better believe I will be curled up in the safest spot in our house, saying Hail Marys and drinking Gin & Tonics (medicinal purposes only, people, for my nerves) until it's all over.
The worst part is, even though this is our first hurricane, we decided to stay and ride it out, rather than evacuate. It's too late now to leave, since Irene will be here soon. We tried to get the opinions of all the locals and SO MANY of our friends here were all "Meh, it's no big deallll, you'll be fiiiiiine!" Come to find out, about half of these people ended up evacuating themselves, leaving us newbies here to fend for ourselves!!
But, in all seriousness. We should be fine. Our immediate neighbors all decided to stay as well and told us they have our backs. I think about how deeply terrified the disciples in the boat were during the storm, and the moment they cried out to Jesus for help, he stood, commanded the sea, and all was calm. We're definitely not alone during this time. Even just writing this now bring so much comfort to my heart.
Anyway, here's a before/after of the dock in our backyard:
 | ||
| What our dock normally looks like. |
 |
| The dock as of 11am. |
 |
| The dock as of 5pm. Also, notice the branches on the tree, being blasted by the wind. |
We'll see how the night goes. Please pray for us and all those who will be affected by this hurricane! I'm looking forward to seeing the sun again! :)
Tuesday, August 23, 2011
Happy 1st Birthday Gemma!!!
I've put this post off a little bit for 2 reasons. 1. We've been insanely busy the past few weeks! and 2. I'm still in denial that my sweet little baby is already a year old!
Her official birthday was August 13th, and on that day, we were all stuck in the car, driving back from a wedding. Strapped into a carseat, facing backwards, is not the best way to spend your birthday. So, to make up for it, we threw her a super, amazing, fantastically awesome Safari Party this past weekend.
Here's a few pictures of the preparations/decorations:

 |
| How cute are these napkins! Ordered from Celebration Express. |
 |
| Yes, we made that sign! I did the letters, Rocky did the artwork :) |

 |
| Check out the LOOT!! (In Safari print wrapping paper of course - Dollar Tree) |

Alright, so, here's the thing. We had food. We had... lots. of. food. Unfortunately, I was so busy making/devouring it, that I forgot to take pictures of almost all of it. There were bbq brisket sandwiches, buffalo chicken dip, veggies, cheese&crackers, fruit kabobs, sausage dippers, shrimp rangoon cups (yea, they're friggin awesome... will post recipe soon), candy, sweet safari punch, chips&salsa... the list. goes. on.
Oh, and some amazing cupcakes that I literally spent close to 4 hours baking/decorating! :)
This was all I managed to get pictures of:
 |
| The Cheese Lion. My brainchild, Rocky's handiwork! |


 |
| So cute!! Worth the effort :) |

Of course, no birthday post would be complete without sharing some pictures of Gemma
 | ||
It all started so nicely...  |


She was taking this whole cupcake thing very seriously... this is as close to a smile as I got out of her!

Note the placement of her chocolate-covered right hand!
All in all, we had such a fun party! First birthday parties can be silly, I know, since technically "they'll never remember it" but really, it's for the parents to celebrate an amazing year of life with their child! I am so, so, so grateful for my little girl. She is truly a blessing in our lives, and I feel thankful to God that I get to be her Mommy. I love you Gemmaroo!!

Subscribe to:
Posts (Atom)
